
Setup
Your HG-1 Prime arrives largely assembled and requires only a few simple steps before it’s ready for use. We’ve designed the process to be straightforward, with illustrated instructions to guide you through assembly and the available mounting options.
The illustrated instructions below cover assembly and mounting, whether you prefer the freedom of a removable installation or a more committed relationship with your countertop.
Printable PDF instructions and mounting templates are also available for download.
ASSEMBLY | BASE KEY MOUNTING | DIRECT SCREW MOUNTING | PRINTABLE GUIDES AND TEMPLATES
ASSEMBLY
SOME ASSEMBLY REQUIRED. VERY LITTLE, ACTUALLY
Your HG-1 Prime arrives almost fully assembled. A few components still need fitting, but nothing that requires an engineering degree or a particularly impressive collection of tools.
Follow the illustrated steps below to complete the assembly. Once everything is in place, you’ll be ready to choose your preferred mounting configuration and prepare your grinder for its first use.
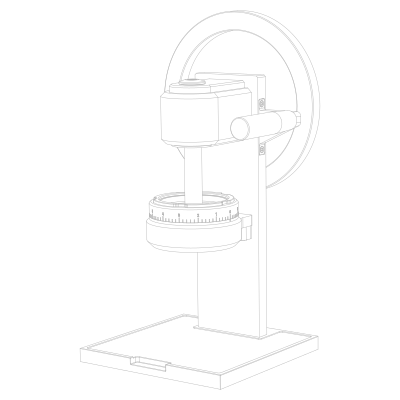
01 OUT OF THE BOX
Carefully remove your HG-1 Prime from its packaging and place it on a clean, stable work surface with ample room for assembly.
Inspect the grinder and included components for any signs of shipping damage before proceeding.
For best performance, keep the bottom of the grinder and your work surface clean and dry.
We recommend retaining the original box and packing materials for future transportation, storage, or warranty service.
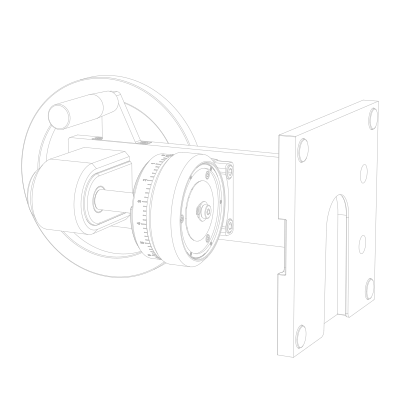
02 PLACE GRINDER ON SIDE
The HG-1 Prime is a substantial piece of equipment. Use care when lifting or repositioning it, as the flywheel can shift easily during handling.
Gently lay the grinder on its side on a soft cloth or towel. Your countertop and the grinder’s finish will both appreciate the consideration.
CAUTION: Keep your fingers away from the burrs and grinding chamber to avoid injury.
03 REMOVE SHIPPING SCREW
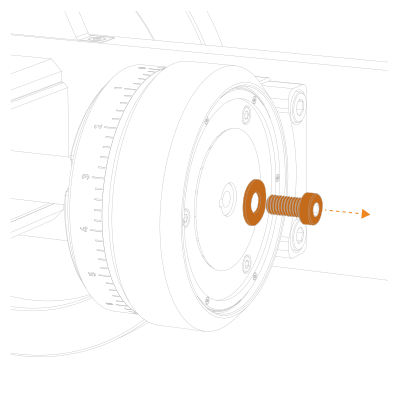
Using the included 5 mm hex key, carefully remove the screw and washer securing the inner burr. Set both aside. You’ll need them again in approximately thirty seconds.
CAUTION: Keep the grinder on its side while the screw is removed. The inner burr is now unsecured and may fall out if the grinder is returned upright. Gravity is remarkably dependable, but not particularly considerate. The inner burr is no longer secured and may fall out if the grinder is returned to an upright position, potentially damaging the grinder or causing injury.
04 ATTACH WIPER
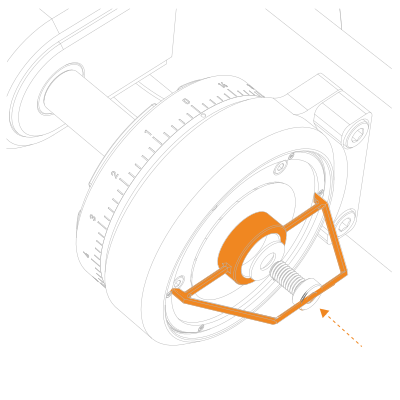
Position the wiper beneath the inner burr, following the illustration for the correct orientation and order of components.
Using the original screw and washer removed in the previous step, secure the wiper to the inner burr with the included 5 mm hex key.
Ensure the wiper is properly seated and securely fastened before returning the grinder to its upright position.
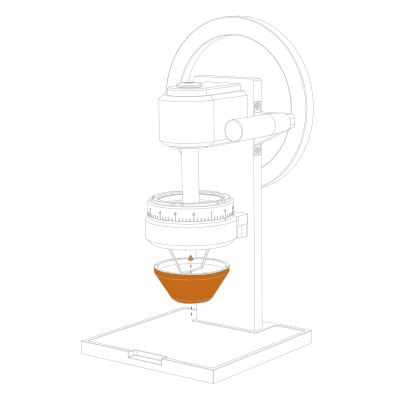
05 ATTACH LOWER FUNNEL
Carefully return the HG-1 Prime to its upright position, ensuring it rests securely on your work surface.
Position the Lower Funnel beneath the Burr Mount and gently raise it into place. The funnel is held securely by six magnets, allowing it to be easily attached and removed without tools.
While holding the funnel against the Burr Mount, rotate it slightly to ensure the magnets align and the funnel seats securely.
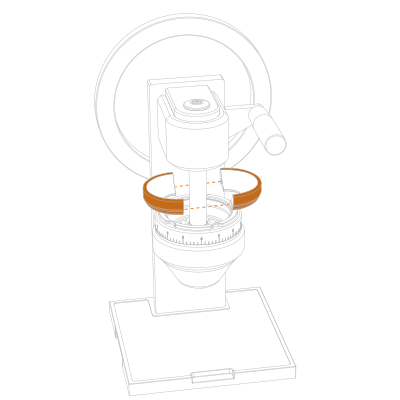
06 INSTALL SPLIT RING BEAN HOPPER
Position the two halves of the Split Ring Bean Hopper around the grinder’s vertical shaft, as illustrated.
Bring them together and let the magnets do their thing. It’s a force of nature.
Gently lower the assembled hopper into place above the grind adjustment dial, ensuring it is properly seated and stable.
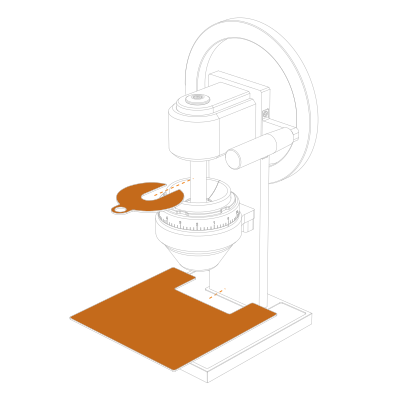
07 INSTALL BASE MATTE AND HOPPER COVER
Position the Base Mat on the grinder’s base, aligning the cutout with the vertical support. Gently lower it into place, ensuring it lies flat and is properly seated.
Place the Hopper Cover over the Split Ring Bean Hopper, aligning the opening with the grinder’s vertical shaft.
The Base Mat helps protect the surface beneath your grinder, while the Hopper Cover helps keep stray bean fragments where they belong.
A little housekeeping before you’ve even made a mess.
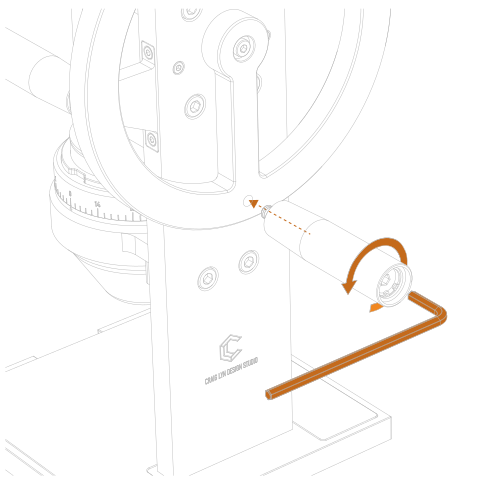
08 ATTACH FLYWHEEL HANDLE
Remove the End Cap from the Flywheel Handle to expose the hex socket.
Using the included 5 mm hex key, thread the handle into the Flywheel counterclockwise.
Yes, counterclockwise. The handle uses a left-hand thread, so the usual rules don’t apply.
Start threading by hand to avoid cross-threading, then tighten securely with the hex key.
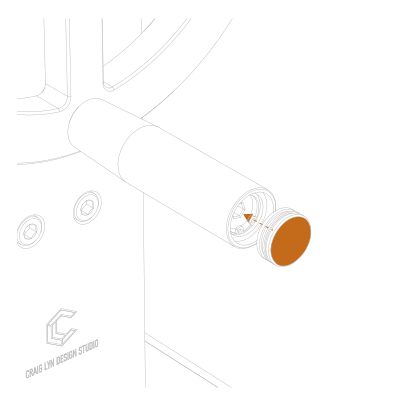
09 ATTACH END CAP
Reinstall the End Cap once the handle is secured.
Congratulations! Your HG-1 Prime is now fully assembled.
Before you start grinding, there’s just one more decision to make: where and how you’d like to mount it.
BASE KEY MOUNTING
COMMITMENT WITHOUT THE COMMITMENT
Mounting your HG-1 Prime is entirely optional. For years, HG-1 owners have happily used their grinders without permanently attaching them to anything.
But if you’d prefer a little more stability, the Base Key Mounting System offers the best of both worlds: a securely mounted grinder that can be removed in seconds.
No complicated mechanisms. No tools required for removal. Just a clever little piece of engineering.
HARDWARE
SMALL PART. BIG RESPONSIBILITY.
Precision CNC-machined from solid stainless steel, the Base Key is designed to provide a stable, durable connection between your grinder and countertop.
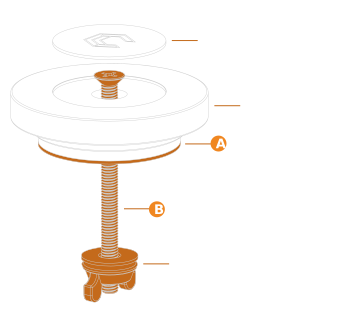
Two installation methods are available:
A — VHB ADHESIVE: A secure installation without drilling.
B — SCREW MOUNT: A mechanical attachment through your countertop.
Both methods use the same Base Key and allow the grinder to be removed whenever necessary.
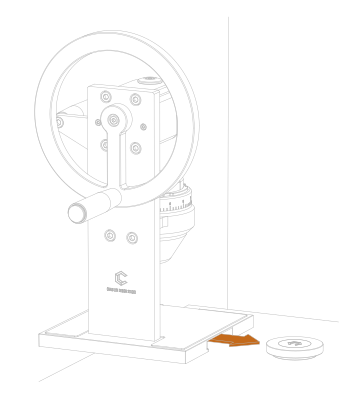
00 SECURE IN PLACE. REMOVE WHEN NEEDED.
The Base Key provides the stability of a mounted grinder without permanently attaching the grinder itself.
Its low-profile design keeps the hardware discreet, while the slide-in connection allows the HG-1 Prime to be installed or removed in seconds.
Perfect for cleaning, rearranging your workspace, or occasionally reminding yourself just how substantial your grinder is.
01 LOCATION
Choose a flat, stable work surface with sufficient clearance to comfortably operate the grinder’s flywheel and handle.
The HG-1 Prime’s dimensions are located here.
Download the Base Key template to ensure proper placement. Measure carefully. Your countertop will thank you.
02 CLEAN THE SURFACE
For adhesive mounting, thoroughly clean the installation area using the included alcohol wipe to remove dust, grease, and other contaminants. Allow the surface to dry completely before proceeding. VHB adhesive is recommended for smooth, non-porous surfaces such as sealed stone, glass, metal, and laminate
Adhesive works considerably better when it’s actually sticking to the countertop.
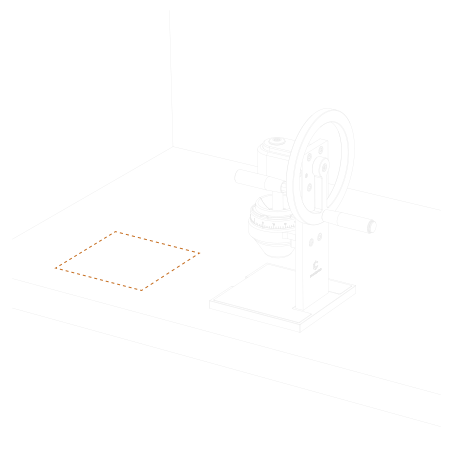
03 ATTACH BASE KEY TO SURFACE
Secure the Base Key using either the supplied VHB adhesive pad (Option A) or the through-counter screw mount (Option B), following the instructions below.
Ensure the Base Key is correctly positioned and firmly secured before installing the grinder.
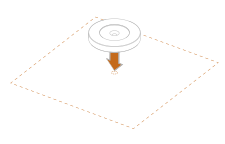
04 BASE KEY INSTALLATION
The Base Key can be installed using one of two methods: 3M VHB adhesive, which requires no drilling or permanent modifications to your countertop, or through-counter mounting, which uses a screw and wing nut for a mechanical attachment.
One avoids drilling. The other involves making a hole in your countertop.
Both provide the same convenient slide-in connection for your HG-1 Prime.
A VHB ADHESIVE

A1 VHB (Very High Bond) adhesive tape is recommended for smooth, non-porous surfaces such as sealed stone, glass, metal, and laminate.
A2 Thoroughly clean the mounting area using the included alcohol wipe and allow it to dry completely.
A3 Remove the protective backing from the VHB tape, position the Base Key using the included template for correct placement, and press firmly into place to ensure good adhesion.
A4 Allow the VHB adhesive to bond for at least 24 hours before installing or using the grinder. Full bond strength is typically achieved after 72 hours at room temperature (approximately 70°F / 21°C). For best results, wait 72 hours before use.
We appreciate that patience is difficult when there’s a new grinder involved.
B THROUGH-COUNTER
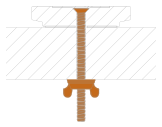
B1 Using the included mounting template, mark the location of the Base Key and the center of the mounting hole.
B2 Drill a 6 mm (1/4”) clearance hole through the countertop or work surface.
B3 Position the Base Key over the hole and insert the supplied screw through the center of the Base Key and countertop.
B4 From underneath the countertop, install the washer and wing nut. Tighten securely by hand, ensuring the Base Key remains properly positioned.
05 INSTALLING THE CAP
Once the Base Key is securely mounted, place the Key Cap into the recessed opening, covering the screw head. The cap is held in place by gravity and requires no adhesive or fasteners.
REMOVING THE KEY CAP
To remove the cap, apply a small piece of adhesive tape to its upper surface, leaving a folded tab to grip. Gently pull upward to lift the cap from its recess. Remove the tape after use.
06 SLIDE GRINDER ONTO BASE KEY
Align the opening beneath the grinder’s base with the installed Base Key. Carefully slide the grinder horizontally onto the Base Key until it is fully engaged. The Base Key prevents the grinder from shifting during operation while allowing it to be removed without tools. To remove the grinder, slide it in the opposite direction until it disengages.
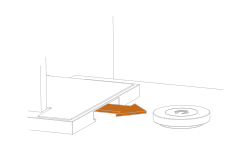
REMOVING THE BASE KEY
To remove an adhesively mounted Base Key, slide a length of dental floss or fishing line between the Base Key and the countertop. Work the line back and forth in a sawing motion to cut through the VHB adhesive pad. Carefully lift the Base Key away and remove any remaining adhesive residue using a cleaner suitable for your work surface.
Dental floss. Not just for teeth anymore.
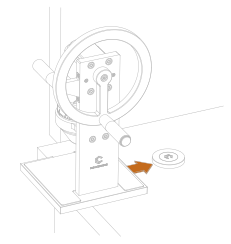
DIRECT SCREW MOUNTING
LET’S MAKE THIS OFFICIAL
For those who prefer a more permanent installation, the HG-1 Prime can be secured directly to your countertop using the optional Screw Mounting Kit. This method provides a rigid, stable connection without the need for the Base Key.
Direct mounting requires drilling through your countertop and installing the supplied mounting hardware. Once secured, the grinder remains firmly in place, providing a solid foundation for everyday use.
It does, however, require drilling through your countertop. So this is probably a good time to be absolutely certain about where you’d like your grinder.
The illustrated instructions below will guide you through the installation process, including hardware placement, drilling, and securing your grinder.
HARDWARE
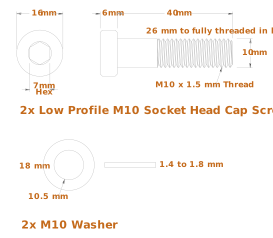
The optional Screw Mounting Kit allows the HG-1 Prime to be secured directly to a countertop or work surface. The kit includes two low-profile M10 socket head cap screws and washers, providing a rigid, stable mounting solution.
Direct screw mounting is an alternative to the Base Key system. The two mounting methods are not intended to be used together.
SOLD SEPARATELY
01 LOCATION
Position the HG-1 Prime on a flat, stable countertop or work surface. Ensure sufficient clearance for the flywheel, handle, and normal operation. Confirm that the underside of the countertop is accessible for drilling and installation.
02 MARK MOUNTING HOLES
Download the Screw Mount Template and place in the desired position. Verify that the template is printed at 100% scale using the reference measurements. Secure the template and mark the centers of both mounting holes.
Measure twice. Drill once. It’s a cliché for a reason.
03 DRILL MOUNTING HOLES
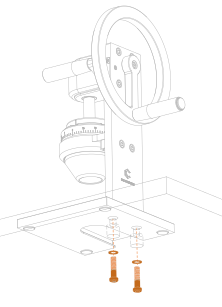
Drill two 11 mm (7/16”) clearance holes through the countertop at the marked locations. From underneath, use a 22 mm (7/8”) or larger Forstner bit to create counterbores at least 8 mm (5/16”) deep to accommodate the screw heads and washers.
04 POSITION GRINDER
Place the grinder over the mounting holes, aligning the threaded mounting points in the base with the drilled holes. Ensure the grinder sits flat against the countertop.
05 REMOVE EXISTING BASE SCREWS
IMPORTANT: Remove the bean hopper and lower funnel before proceeding.
Carefully lay the grinder on its side on a soft, protective surface. Support the grinder’s base while removing the two existing mounting screws.
CAUTION: The grinder’s bottom base is located by two stainless steel dowel pins connecting it to the rear frame. Once the screws are removed, the base is no longer securely attached and may separate from the grinder without warning.
Keep the base supported at all times, especially when returning the grinder to its upright position. Failure to do so may result in the base falling and causing injury or damage to the grinder.
06 INSTALL SCREWS AND WASHERS
From underneath the countertop, place a washer onto each supplied M10 screw. Insert the screws through the mounting holes and thread them into the grinder’s base. Start both screws by hand to prevent cross-threading.
A little patience here can save a great deal of frustration later.
07 SECURE GRINDER
Using a 7 mm hex key, tighten both screws evenly until the grinder is firmly secured to the countertop. Do not overtighten. Verify that the grinder is stable and cannot shift during operation.
IMPORTANT: The supplied screws are M10 × 1.5 mm, 40 mm long. Confirm that the countertop thickness and counterbore depth allow sufficient thread engagement without the screws bottoming out. Longer screws may be required for thicker countertops.
And that’s it. Your HG-1 Prime isn’t going anywhere.
VIDEO GUIDE — DIRECT SCREW MOUNTING
AN OLDIE BUT A GOODIE
Originally produced for the 2022 HG-1 Prime, this video demonstrates the direct screw mounting process, which remains unchanged on the current model. While some details of the grinder may differ, the mounting procedure is identical. Follow along for a visual walkthrough of the installation.